Vue.js + Vuetify
Vue.js + Vuetify guide for Trezo.
Overview
Trezo is built on the powerful Vue.js framework and Vuetify, offering a fast, dynamic, and fully responsive solution for modern web applications. Leveraging Vue.js’s reactive data binding and component-based architecture ensures smooth performance and seamless navigation, while Vuetify provides a flexible and robust design system with extensive customization options. The project emphasizes modularity and component-driven development, enabling scalable and maintainable code. With pre-built components, utility classes, and a mobile-first design philosophy, the application is crafted to deliver a streamlined and engaging user experience across devices.
Key Features of Vuetify.js:
Vuetify.js is a popular open-source UI library for Vue.js, designed to help developers create visually appealing and responsive user interfaces following the Material Design principles. Vuetify provides a rich collection of pre-designed components, powerful theming capabilities, and flexible layouts, enabling rapid development of professional-grade applications.
-
Material Design Compliance: Vuetify strictly adheres to Google's Material Design specifications, offering consistent and modern UI components..
-
Extensive Component Library: Includes a wide range of ready-to-use components such as buttons, cards, modals, data tables, sliders, and more, reducing the need for custom UI development.
-
Responsive Grid System: A powerful and flexible grid layout system supports responsive design, ensuring applications look great on all devices.
-
Ease of Integration: Built specifically for Vue.js, Vuetify seamlessly integrates with Vue Router, Vuex, and other parts of the Vue ecosystem.
-
Comprehensive Documentation: Provides detailed documentation and examples, making it beginner-friendly and easy to adopt.
Why Use Vuetify.js?
- Rapid Prototyping: Quickly create professional-looking UIs without designing from scratch.
- Consistency: Material Design ensures a cohesive user experience across applications.
- Flexibility: Easily customize styles and behavior to suit project needs.
- Active Community: Backed by a large community and regular updates, Vuetify is reliable and well-supported.
Vuetify is an excellent choice for developers who want to build aesthetically pleasing and fully responsive Vue.js applications with minimal design effort.
Local Development Environment Setup
In order to kickstart the development of your web app with Trezo, the very first thing is to setup an Vue.js development environment.
Node.js & npm
- Node.js and NPM: If NodeJS is not installed then download it from https://nodejs.org/ Google Fonts. NPM comes bundled with Node.js
- Now check the version if everything is installed nicely like open the
terminal/bash/command promptand runnode -vnpm -vif you get any number then everything is just fine.
Open the terminal and run the command npm install -g @vue/cli. To get more help on the Vue.js CLI check out the Vue.js CLI Guide.
NPM Packages
- Before proceding you'll need to install npm packages. You can do this by running
npm installfrom the root of your project to install all the necessary dependencies.
Development Server
- Run
npm run servefor a dev server. Navigate to http://localhost:8080/. The app will autometically reload if you change any of the source files.
Building
- Run
npm run buildto build the project.
Pages Info
All Pages
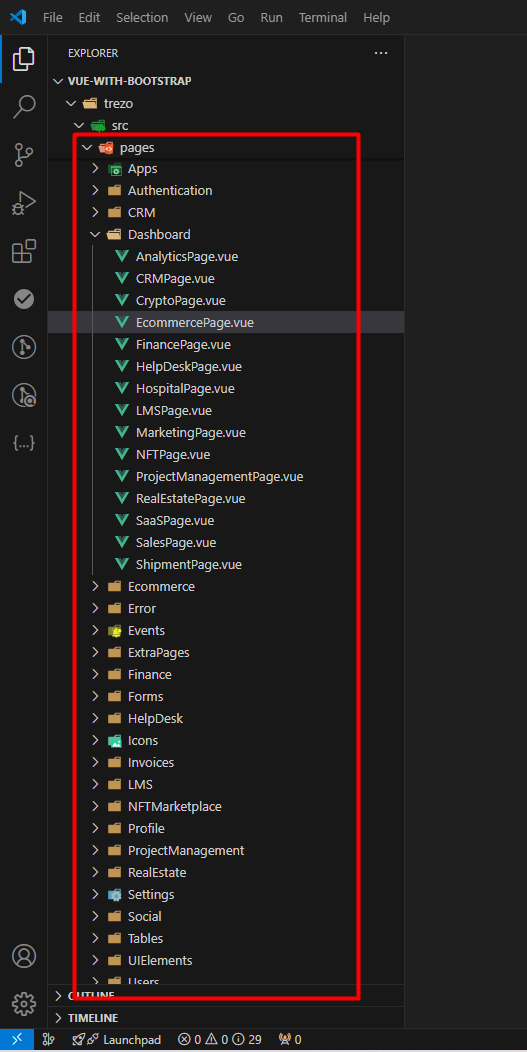
Pages Components
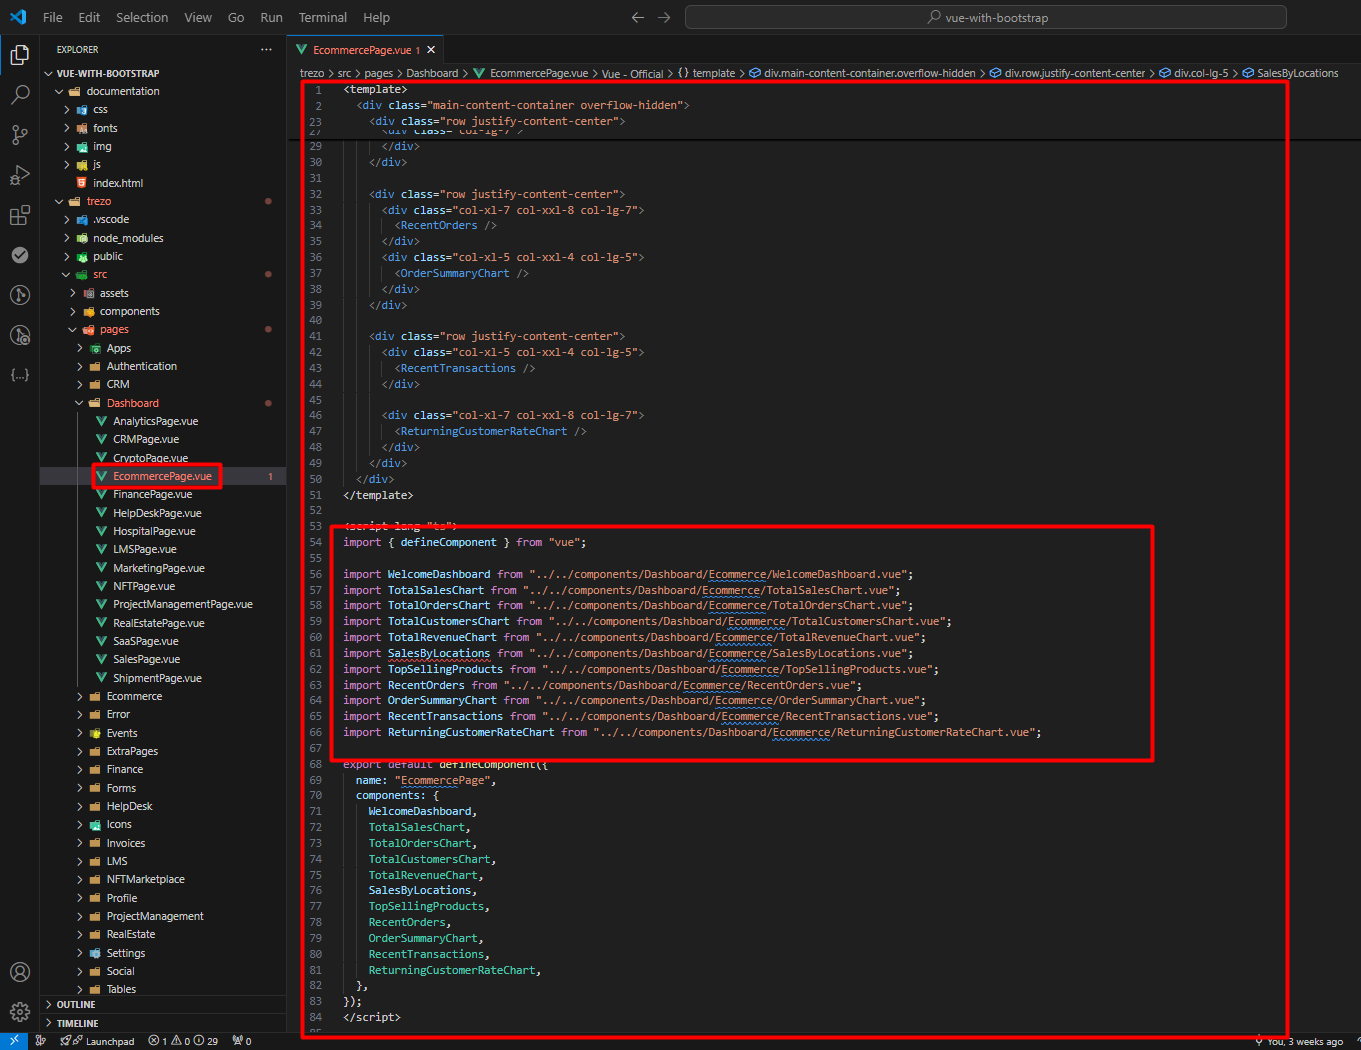
All Pages components are there & based on the pages name you will find the components folders inside components.
Dependencies
Here are the dependencies list which being used in the Trezo Nuxt.js Template:
package.json
"dependencies": {
    "@fullcalendar/core": "^6.1.15",
    "@fullcalendar/daygrid": "^6.1.15",
    "@fullcalendar/interaction": "^6.1.15",
    "@fullcalendar/timegrid": "^6.1.15",
    "@fullcalendar/vue3": "^6.1.15",
    "@mdi/font": "^7.4.47",
    "@vueup/vue-quill": "^1.2.0",
    "apexcharts": "^4.0.0",
    "core-js": "^3.8.3",
    "quill": "^2.0.2",
    "remixicon": "^4.5.0",
    "swiper": "^11.1.15",
    "vue": "^3.5.13",
    "vue-router": "^4.4.5",
    "vue3-apexcharts": "^1.7.0",
    "vue3-carousel": "^0.7.1",
    "vuetify": "^3.7.4"
},
"devDependencies": {
    "@types/lodash": "^4.17.13",
    "@typescript-eslint/eslint-plugin": "^5.4.0",
    "@typescript-eslint/parser": "^5.4.0",
    "@vue/cli-plugin-babel": "~5.0.0",
    "@vue/cli-plugin-eslint": "~5.0.0",
    "@vue/cli-plugin-typescript": "~5.0.0",
    "@vue/cli-service": "~5.0.0",
    "@vue/eslint-config-typescript": "^9.1.0",
    "eslint": "^7.32.0",
    "eslint-plugin-vue": "^8.0.3",
    "sass": "^1.81.0",
    "sass-loader": "^10.5.2",
    "typescript": "^5.6.3",
    "vue-cli-plugin-vuetify": "^2.5.8",
    "webpack-plugin-vuetify": "^3.0.3"
}
Fonts Used
By default, the template loads Inter font from Fontshare Web Font Services. The font can be changed based on the website needs. Google Fonts
You will find the font code in the "style.scss file: src/assets/scss/style.scss
**
- Default CSS
*/
@import url("https://fonts.googleapis.com/css2?family=Inter:[email protected]&display=swap");

/* You can add global styles to this file, and also import other style files */
// Fonts
<link href="https://fonts.googleapis.com/css2?family=Inter:[email protected]&display=swap" rel="stylesheet">
<link href="https://fonts.googleapis.com/css2?family=Epilogue:ital,wght@0,100..900;1,100..900&display=swap" rel="stylesheet">

// Components CSS
@import "./components/global";
@import "./components/sidebar-menu";
@import "./components/main-content";
@import "./components/header-area";
@import "./components/footer-area";
@import "./components/status-box";
@import "./components/sales-by-locations";
@import "./components/default-table";
@import "./components/pagination";
@import "./components/calendar";
@import "./components/chat";
@import "./components/timeline";
@import "./components/priceing";
@import "./components/products";
@import "./components/rtl";
@import "./components/dark-mode";
@import "./components/sidebar-dark";
@import "./components/header-dark";
@import "./components/footer-dark";
@import "./components/card-style";
@import "./components/card-bg-style";
@import "./components/fluid-boxed-style";
@import "./components/landing-page";
@import "./components/analytics";
@import "./components/nft";
@import "./components/marketing";
How to Run The SCSS File
Please open the file Visual Studio Code Editor. And follow the video tutorial.
Here the Link: Watch this video on YouTube
Credits
Note: All images are used for preview purpose only and not included in the final purchase files.
Images
Google Fonts
IconFont
Packages
Additional Notes
If you need more details, please refer to the written instructions.
Feel free to reach out to our support team if you have any questions!